How To Build an Ant Moat for Your Hummingbird Feeder
"ANT_MOAT.HTM" 18 Feb 2026 22:02:13 (JGKNAUTH)
Hummingbirds love the sugar water you put in your hummingbird feeder. So do ants. An infestation of ants pretty quickly makes hummingbirds decide to go elsewhere.
One way to keep ants away from the feeder is to coat paths to the feeder (e.g., along the feeder's hanging wire) with something like salad oil. Ants hate going thru the sticky stuff, so they don't try. Unfortunately the oil doesn't last long under a summer sun. You have to keep reapplying it; otherwise it dries out and the ants can then make their way to the feeder. However, while constantly reapplying the salad oil, you also find out why the ants hate it. It really is a sticky mess to deal with.
A much neater solution is to install an ant moat above the feeder. Hang the ant moat where you previously hung the feeder. Then hang the feeder from the connector at the bottom of the ant moat. The moat is filled with water. To get to the feeder, the ants would have to swim across the moat. Because they won't do that, the ant problem is solved.
Maintenance of the ant moat is easy. If rain doesn't provide enough water, just pour in some when required. There is no salad oil mess to deal with. Wash it out occasionally to remove any debris that might fall in and to prevent growth of anything undesirable.
Another benefit of the moat is that small birds, e.g., goldfinches, like to perch on the side of the cup and drink from the moat.
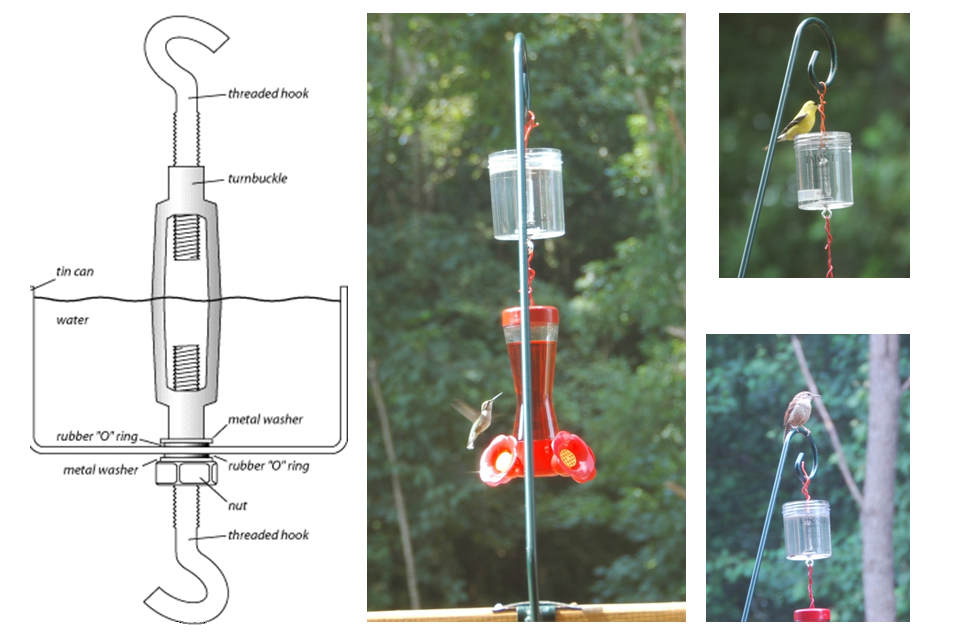
Below are instructions for building the type of moat I use. There are other ways to build one, involving glue guns or something similar. However the design below works well. Its moat is easy to put together and requires no special tools. I got the idea from a forum that documented a design from the University of Kentucky. Instead of the tin can mentioned in their diagram below, I use a one-pint Talenti gelato jar for the moat container. It's a clear, thin-plastic jar. Because it is clear, it is very easy to see if the moat needs water or cleaning. Anything similar would serve the purpose. I prefer to use a two-eye turnbuckle instead of the two-hook turnbuckle shown in the diagram. For my situation, the eyes provide a more secure attachment for the hanging wires.
Configuration Update
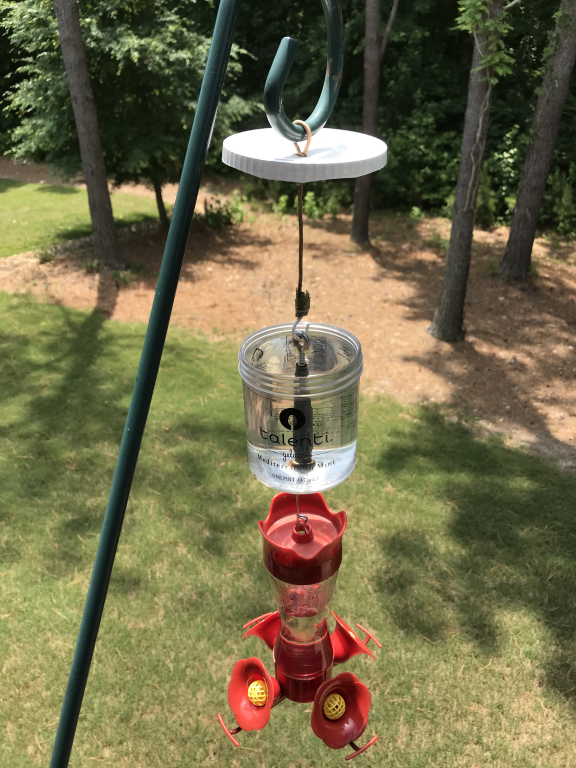
The above old pictures show how I previously used just wire to hang the feeder and ant moat. However that made it difficult to disconnect the items. Nowadays I use a metal hook between the feeder and the ant moat (this is not shown too clearly in the picture on the right). I also now have a cuphook taped to a wire to hang the ant moat (shown better in the picture.) All this makes it much easier to detach things for cleaning the ant moat and for refilling the feeder. This setup is not hurricane proof, but I always take down everything anyway when tropical winds are forecast. Squirrels can also be a problem; they do like to climb on things, even way out there. However that hasn't been a problem with this arrangement for several years.
I didn't try to update the rest of this writeup to mention using hooks instead of just wires for hanging. Wires will still work if you don't want to bother with hooks or something similar.
A couple of years ago I attached a plastic lid high on the wire to act as a "poop umbrella". Birds used to sit up at the highest point of the hanger and do their business down into the ant moat. The result seemed to bother me more than the goldfinches, but I added the umbrella (left over from some old food container) to solve the poop problem.
Parts
Below are the parts required and the approximate (high-side bias) total cost for each of the components. The cost can vary a good deal, e.g., depending on where you buy, whether you buy in bulk, etc.. To resist corrosion I recommend stainless steel for the metal parts, although they are usually more expensive than zinc-plated parts. (Note that the parts are outdoors and mostly under water.) As noted above, I prefer the turnbuckle type with two eyes. The parts listed below are compatible with each other. If you use other hardware, be sure you get a nut and washers that fit the bolt of the turnbuckle you choose.
The hanging wires can be any short lengths of scrap wire with lengths appropriate to how you want to hang the ant moat plus feeder. The container is free after you have eaten the gelato. (You could probably get help with that if you need any.) The rubber (plastic?) washers are standard faucet items and can usually be found in the plumbing supply area of a hardware store. I happen to use such washers instead of the "O" rings specified in the diagram, just because the washers were easier to find.
| Part | Number | Cost | Comments |
|---|---|---|---|
| #10-24 nut | 1 | $0.15 | Stainless steel |
| #8 washers | 2 | $0.20 | Stainless steel |
| 3/16" x 5-1/2" turnbuckle | 1 | $5.00 | Stainless steel |
| Flat rubber faucet washers | 2 | $1.00 | #000, #00, #0 work |
| Plastic container | 1 | $0.00 | From scrap |
| Short wires for hanging | 2 | $0.00 | From scrap |
Construction
Here's how I build an ant moat. You might to it a different way.
- Make a hole in the center of the bottom of the container. It is usually quite hard to drill the hole, especially since there is often a mound of plastic at that point, both inside and outside the container. Instead of drilling, I just hold a nail with pliers over a gas burner until it is red hot. The nail then easily melts thru the plastic. I move it around a little to enlarge the hole. The hole eventually needs to be large enough for the turnbuckle bolt to pass thru -- a little larger than a quarter of an inch. As part of the next step you can enlarge the hole if required; it doesn't have to be the final size yet.
- Flatten out the area around the hole by filing, cutting, sanding, or whatever the undesired plastic that probably built up when you melted or drilled the hole. The intent is to have a fairly flat surface for the washers to sit on and provide a watertight seal. This flattening process is really the hardest part of the whole construction because of the tight quarters inside the container. It takes some doing to remove the extraneous plastic, but it doesn't have to be perfect. Be patient.
- Remove one of the bolts from the turnbuckle by unscrewing it. At this point you may find that the unscrewing seems to be going in the wrong direction compared to what you are used to. If so, stop and instead unscrew the bolt at the other end of the turnbuckle. A property of a turnbuckle is that one of the bolts is right-handed and one is left-handed. That's needed for a turnbuckle to do its normal job of lengthening or shortening a line, e.g., one formed by ropes connected to the two connectors, when the center body is rotated. This interesting property is not required for the ant moat, but does mean you must be careful to unscrew the correct bolt here, the one with the right-hand thread, since the nut has a right-hand thread. When the correct turnbuckle bolt is completely unscrewed from the center body, make sure the nut can be screwed on that bolt. This verifies the bolt and nut threads are compatible in direction and size.
- Rotate the nut all the way to the end of the removed bolt and put a metal washer and then a flat rubber washer down the bolt shaft to rest on top of the nut.
- At this point I usually put some Vaseline around the edges of the container hole, both on the inside and outside surfaces, to help make a good seal.
- Now insert the bolt thru the container hole and put a flat rubber washer and then a metal washer on the shaft, down to the bottom of the container.
- Finally, screw the bolt back into the turnbuckle by turning the center part of the turnbuckle and/or the bolt, which is now thru the bottom of the container. Make a tight connection. Sticking a screwdriver thru the eye of the bottom bolt is a trick to give you a lot of leverage.
- Construction is now complete. You can test it by filling the container with water and resting it on a cup to see if any water leaks out.
- You can hang the ant moat using a wire attached to the top bolt of the turnbuckle and hang the feeder using a wire attached to the bottom bolt. Note that by turning the top bolt (seemingly in the wrong direction) you can adjust how much of the bolt sticks out of the container; this might be useful in some cases. Just be careful not to turn it too far or it will come loose. Leave enough screwed in so that it won't unscrew accidentally, e.g., in the wind, and drop everything to the ground.
jeff@jgkhome.name